Well the course took already place on November 7th, 2020 but while focussing on the build of my multi function workbench I missed to write that post about my participation in the router course. That should change today.
This course was a full day course with lunch break. The content of the course can be summarized as follows:
The safe use of routers and using routers in different type of usages were the most important parts of the course.
- Different type of routers
- Routerbits
- Safety
- Jigs
- Procedures
- Routing profiles
- Material types and usage
Detailed information about the cource can be found on the original course descriptions which are in german using the following links:
That course was very helpful for me. I was totally impressed by the simple slab flattening mill setup we used. I started thinking about building one for myself.
I will try to summarize the course using some photos I took during the course.
Cuttin circles using a template
| Creating coasters out of apple wood |
|---|
 |
Cutting circles with a cutting guide (compasses)
| Cutting board out of cherry wood almost cut | Edges rounded with a 5mm round edge bit |
|---|---|
 |
 |
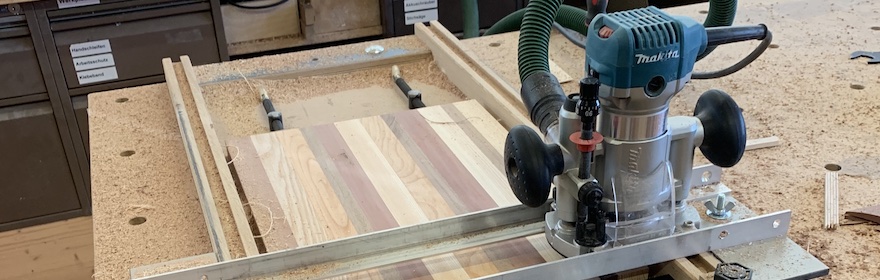
Using a Slab flattening mill
First we glued together some stripes of different woods to make a cutting board.
| Stripes of wood | Glued together to a board |
|---|---|
 |
 |
Now let’s move on to planing that board. The jig is mounted on top of the MFT and we can start with the planing process. Even though a shop vacuum was attached to the Makita router that process produces a lot of wood dust and chips. Since I started thinking to build a jig myself I will try to use a dust shoe as it is used in CNCs that you can get online. Maybe I just order one provided fromt he CNC manufactureres as optional accessories or I download a model from Thingiverse and print it out myself on a 3D printer.
| Board clamped into the jig | Work in progress |
|---|---|
 |
 |
| View from the back | View from top |
|---|---|
 |
 |
| Cut to size and champfer routed |
|---|
 |
Routing finger joints
For routing finger joints we started to build a small jig out of some pieces of precut wood pieces and a CNC routed template. You can use that jig fixed on a workbench with a handheld router or use that upside down on the routertable.
| Finger joint template |
|---|
 |
Ich habe die Zinken an meinem Werkstück zu Hause nochmal am Frästisch nachgearbeitet. Wir haben mit der Schablone 4 Nussbaum Bretter gefräst um daraus einen Kasten zu bauen.
| Walnut boards | |:-|Walnut boards](/images/post/0005/13-nussbaum-brettchen.jpg “Walnut boards”)
In the shown picture there is nothing routed yet. I did finish the box at home after the course and practiced that on my routertable. Instead of using a lid and bottom out of plywood I created lids using maple. I cut a rabbet in the box pieces and integrated even 4 small magnets to hold the lid on the body of the box. The box was given a finish of oil.
| Bottom and top part of the box | |
|---|---|
 |
 |
| Finished box |
|---|
 |
The course was very interesting for me and I learned a lot. I was totally facinated by the slab flattening mill setup. I will try to build one myself and document that in a futue blog post. I will try to use the finger joint jig on my router table to create some boxed or drawers with it.